New Compass-Rose Display software for the Montreal Doppler III DF unit (and the Doppler II unit running the alternate
firmware.)
You can also have an "outboard" (remote)
compass
rose display - here's
how!
Please note: This is not an official page of
VE2EMM: Please read the disclaimer
below.
Replacement firmware is now available for the Compass
Rose display for the Montreal Doppler III unit (even using Jacques'
original firmware) that offers a number of enhanced features:
Using the compass rose with the Montreal Doppler II
unit.
Using the Alternate
Firmware, this same software may be used with the older
Montreal
Doppler II unit to provide a compass-rose display.
This firmware adds the capability of a synchronous data stream
to the
Doppler II: For more information on how it is connected, see the Doppler
II modifications page.
Three-color display:
The current ("integrated" - but "un-averaged") bearing is shown
in green while a
bad
bearing
is shown in red and the averaged bearing is
shown
in yellow.
Display of average direction:
The "averaged" direction is displayed in yellow. There
are
three
modes of bearing averaging:
A sliding average: This consists of the
16 most
recent
"good" bearings.
A running average: This consists of the
average
direction
of all "good" bearings since the unit was powered up or since the
average
was reset.
True average, as calculated by the main Doppler unit,
the number of averages being adjustable via the main Doppler
unit.. This feature is only
available with Compass Rose firmware versions 2E and newer in
conjunction with Doppler Firmware version 7A and newer.
The use of an averaged bearing can help the user identify
possible
trends
or "biases" in bearings on extremely weak or "multipathy"
signals.
Additionally, the averaged bearing continues to be displayed even after
the signal has disappeared.
An average (in the first two mode) may be reset at any time.
If desired, the "average" display may be turned off.
"Bearing History" display:
If desired, the past 15 "good" bearings may be displayed more
dimly
than
the current bearing as to avoid confusion. This allows the user
to
glance down at the display and note the "quality" of the recent
bearings,
to help identify trends, or, if the signal has since disappeared, to
see
the last several bearings. This feature may be turned off at any
time.
Dim/Bright display selection:
When using the suggested type of dual-color LEDs (see below)
the
display, when in "bright" mode, may be used in daylight. While
not
bright enough to easily be seen if direct sunlight is flooding the
display,
it is very readable if placed out of direct sunlight. If the user
also turns off the "Bearing History" display, the LEDs are even
brighter.
At night, a bright display may be too bright: The "Dim"
setting
makes
the display more comfortable to look at in the dark.
Display "flipping":
The display may be "flipped" (as if in a mirror) so that east
is on the
left and the west is on the right. Why do this? This allows
a reflection of the compass rose to be viewed with the bearings
in their proper orientation. An example of where this may come in
handy is if the display is placed on the dashboard of the
vehicle:
The result is a rudimentary "heads-up display" where the
compass rose
appears,
floating, in the windshield. While it is not
recommended
that
a single person drives the vehicle and operates the DF
unit,
this
facility allows the passenger/navigator to do his/her job while looking
out the window (and maybe avoiding getting carsick...)
Front and back views of the
(modified) compass
rose display. Click on either image for a larger version.
Required modifications:
Because of the expanded capabilities, there are a few simple
modifications
required to update a currently-operational display. Note that
this
software is not fully usable unless dual-color LEDs are
installed - but it can be used with single-color LEDs if
appropriately configured - see below!
Replacing the LEDs:
All 36 of the compass-rose LEDs (LED1 - LED36) must
be
replaced
with (or originally installed as) dual-color units. The
recommended LEDs are T1-3/4 sized and,
if the LEDs originally suggested by Jacques (in his first version of
the compass rose) had been used, this will
require drilling larger holes in the front panel.
The LEDs recommended for the compass are DigiKey P/N: 160-1038-ND
which
is Liteon P/N: LTL-293SJW.
The Liteon LTL-293SJW is same type as originally recommended by
Jacques for the center LED on
the older versions of the compass rose.
The newer
versions of the compass rose board (e.g. version 3.2) specify the use
of a 3-lead dual-color LED
- see below
for more info.
Note that the center LED (LED37) need not be
changed on the "pre-Version 3.2" boards.
Different two-color LEDs may also be used as long as they are of
the two-lead
variety where color (red/green) is determined by polarity of the
applied
voltage. Note that the use of different LEDs may cause the
"yellow"
(a mixture of red and green) to be either too "greenish" or "red-ish" -
depending on the relative brightness of the green/red emitters in the
LED.
If this is the case, the color may be "tuned" slightly by the selection
of an install option or, if that doesn't work, by the addition
of resistors/diodes - contact me (at the email address below) for
details.
LED Installation notes:
Note: As originally designed, the dual-color
LEDs, when used with this alternate firmware, were to be mounted backwards
- that is, for LED1, the parts-placement drawing shows the the flat
part
of the case facing up - but this dual-color LED should be
mounted
such that the flat spot on LED1 is facing down. In
other
words the green cathode is connected to the
current
limit resistors, R1-R6.
Important note:
If you do install the 36 compass-rose LED as shown in the
original diagram (that is, they are not backwards) don't
worry: Firmware versions 2E and
later
have a "polarity reversal" mode (see below) that can be used correct
this.
If you use dual-color LEDs other than the Liteon
device specified,
verify polarity (and test) before mounting all of them. Please
note that the firmware will default to a duty cycle that was
intended to provide a yellow color for the specified LEDs. If
your "yellow" color is too "red" then you may need to adjust the color
mix as mentioned
below.
Mounting the center LED in
the original - "pre version 3.2" boards:
The Center LED:
Remember that the center LED is
mounted as
shown in the parts-placement drawing, as this is the LED called out in
the original parts list when using the original versions
of the boards..
Important note about the newer Version 3.2 Compass Rose
boards:
Be careful when using the "Version 3.2" boards!
When Jacques released the "Version 3.2" boards, there was one
major change made to the Compass Rose display: He changed from
using a 2-lead red/green LED to a 3-lead version.
If you have a Version 3.2 board and are using it with my
"alternate" firmware, you cannot use the "3-lead" center LED!!!Refer to the instructions to the left for the necessary
modifications.
If you do use a 3-legged LED, the "mode" switch
functions will not work as it will appear as though one or both buttons
are being "pushed" with one or more of the symptoms:
Working normally, the aziumth LEDs will "spin" 3 times (one
in each color) when it is powered up. This will NOT
happen if either button is being "pressed."
The compass rose display will not respond to bearings from
the main unit - that is, it won't "track" what you see on the LCD.
If this happens, first remove the center LED and the mode switch
completely and check for solder bridges and then power it up
again: If it "spins" 3 times, the problem is with the wiring of
the "mode" switch and the center LED.
If it still does not work properly, then check for
shorts to ground on RB0-RB7 (e.g. pins 6-13) - and also that the PIC
chip is inserted properly - that is, pin 1 is oriented away
from the center of the board.
Newer versions (Version 3.2) of the Compass Rose board specify
a 3-lead LED.
The 3-lead LED CANNOT be used with this firmware!
Because
the
firmware
relies
on
the ability to detect the three
possible states of the mode switch (e.g. ground, V+, and floating) the
LED used cannot be ground-referenced.
Unfortunately, the 3-lead LED does provide a ground
reference, causing the unit to work erratically - if at all.
Fortunately, the work-around is easy: Simply use a 2-lead,
2-color LED - one of the same type used for the compass rose (e.g. the
Liteon device mentioned above.)
When using the 2-lead Liteon LED on the version
3.2
board,
skip over the center (ground) hole, making sure that the flat
side
of the LED is facing the "NORTH" LED (that is, up.) It
seems that when the board was reworked to accomodate the 3-lead LED
that the physical location of the pins was changed, so make certain
that you avoid using the pin that was grounded!
In this case,
only one 220 ohm resistor is needed, and this resistor's value may be
adjusted to provide the desired brightness of the center LED, so either
one of the original resistors may simply be jumpered across. If
you are re-fitting an original Version 3.2 board, there's no real need
to remove (and jumper across) one of the resistors unless you find the
center LED to be too dim for your taste.
Swapping Data and Clock leads:
When Jacques originally designed the Compass rose, he simply used a
software "bit-bang" function to receive the SPI data as the PIC he
originally
chose (the PIC16F628/A) does not have hardware SPI capability.
Because this new
software
does a lot of multiplexing of the LEDs, this approach could not work.
While the PIC that I use (the PIC16F819) does have a
hardware SPI module,
the
pins used by Jacques do not map to the SPI inputs. Rather than
requiring
a more complicated rewiring of the board, I was able to utilize Timer0
to receive the SPI clock signal - but this requires that the Data and
Clock
leads be swapped - a very simple modification.
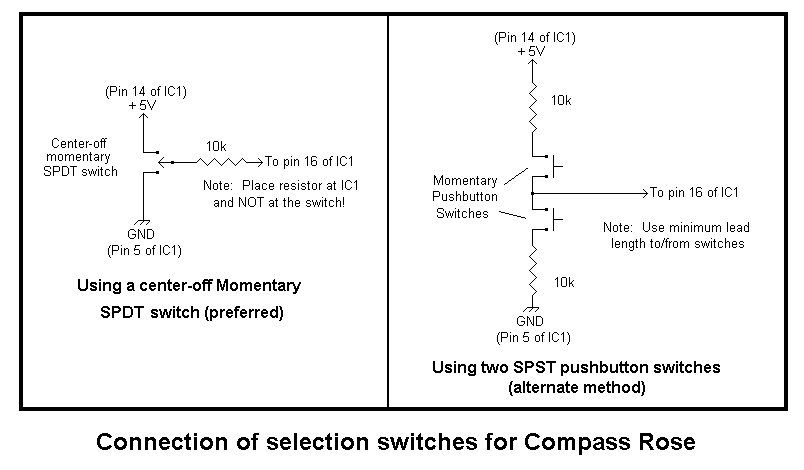
Schematic showing the connection
of the mode selector
switch(es). Click on image for a readable version
Mode selector switch:
The addition of a mode-select switch is highly recommended.
The
ideal
choice
is
a
momentary, center-off SPDT switch - but these can
sometimes be difficult to find. (I used a CW Industries model
GRS-4013C-0001 switch, available from Mouser
Electronics. This is a snap-in, square, black rocker
switch.)
If you have too much difficulty finding a center-off momentary SPDT
switch, an alternative is to use a pair of momentary SPST
switches.
Note that the signal from pin 16 of the PIC is somewhat
noise-sensitive,
so it is best to locate the switch fairly close to the PIC itself -
especially
the 10k resistor in the case of the single SPDT switch version.
In
the case of two SPST pushbutton configuration, it is best to minimize
lead
length as much as practical.
Note that mode changes are saved in EEPROM so they will be in effect
the next time that power is applied.
Replacing the chip:
The final modification is quite simple: Plug in the
processor
with the new software. (You did use a socket,
didn't
you?)
Operation of the mode selector switch(es):
There are two positions of the switch(es): The "+" position -
closing the switch connected to V+ - or the "-" position - closing the
switch connected to ground.
There are also three ways to operate the switch(es):
Holding a button while applying power.
During operation, a momentary contact. The change takes
effect
the instant that the button is released.
During operation, pressing and holding (for about 2 seconds) and
then
releasing. Note
that the change takes effect after holding the button for the required
amount of time.
Holding a button while applying power:
+ (plus) - Toggles the direction of the display (e.g. "flips"
the
display.)
- (minus) - Toggles the enabling/disable of the average display
Pushing a button momentarily:
+ (plus) - Toggle between Dim and Bright display
- (minus) - Clear the history (if enabled) and/or
average (if
enabled.)
Pushing and holding a button:
+ (plus) - Enable/disable history display (does not affect
average)
- (minus) - Toggle between running and sliding average (this
resets
the
average.)
Comment:
Compass rose firmware versions prior to 19
July,
2005 had the "Dim/Bright" and "Enable/Disable History" button functions
swapped, that is a momentary press enabled/disabled history while a
"pressing-and-holding"
toggled dim/bright.
The center LED:
In Jacques' original firmware, the only 2-color LED was the center
LED:
This indicated red to show that the bearing was bad and green to show
that
the bearing was good.
In this firmware, the center LED blinks briefly along with the
cardinal points
and the color indicates one of several conditions:
If averaging is enabled:
Red center LED: This indicates that the compass
rose
in the running
average mode. In this mode, the average direction displayed
is
based on all bearings received since the unit was powered up or
since the average was cleared.
Green center LED: This indicates that the compass
rose
is
in the sliding average mode. In this mode, the average
direction
displayed is based on the 16 most recent good bearings.
If averaging is disabled:
Red center LED: This indicates that the most
recent
bearing
was "bad" (e.g. below the quality threshold setting.)
Green center LED: This indicates that the most
recent
bearing
was "good" (e.g. at or above the quality threshold setting.)
Comment:
I couldn't think of anything else to do with the center
LED: If
you have some ideas, let me know...
Other blinking LEDs:
The LEDs at the 4 cardinal points (North, South, East and West)
dimly
blink in unison with the center LED. The North LED
always blinks GREENwhile the other three blink RED.
This
is
done
so
that
one may visually orient the display in the dark.
Useful operational tips:
When powered up, the compass display will "spin" two full
revolutions (one
red, then one green) in the direction of operation. If the
compass
spins CLOCKWISE then the compass rose is in the normal
mode.
If it spins COUNTER-CLOCKWISE upon power-up, the
display
is flipped from right-to-left. On power-up, the display always
spins
in the direction of increasing degrees!
When in daylight, it's can be difficult to see the display - not
to
mention
the dimmer "history" display, so it is probably best to shut off the
history
display anyway. Doing so diverts more power to the
direction/average
LEDs and makes them noticeably brighter. Turning off the average
will
make it slightly brighter, still - but since the average is so useful,
you
may not want to shut it off.
Remember that the averaging only shows the proper bearing while
you are
stationary or traveling in a straight line. If you turn a
corner,
the average built up so far becomes useless - especially if the
compass
rose is in the "running average" mode! This is what the
"Average
Clear" function (momentarily pressing the "minus" button) is
for!
Until the first bearing comes from the DF unit,
none
of the
LEDs may light up - other than those that are blinking. This
is
particularly
true
if
the
firmware is configured to send the average
bearing to the compass-rose display! (Note that this only applies
if you are using the alternate
firmware.
Using the Alternate
firmware one may select whether the bearings sent to the
compass
rose are the integrated bearings or the averaged
bearings. It
is important to note that selecting these two sources causes
the
compass rose to behave differently, however:
When integrated bearings are being sent to the compass
rose, good
bearings will display as green while bad
bearings
will display as red. The threshold between "good"
and
"bad" is determined by the "QF" setting. What this means
is
that even when there is no signal, or the signal is bad, you
will
still get direction indications.
Averaged bearings, on the other hand, consist only
of
"good" integrated bearings. For this reason, when the "good"
integrated bearings stop, the average output stops being
updated as well. For this reason the compass rose will stop
being updated when the input signal is of poor quality and/or if the
signal
goes away. Note, however, that several "good" bearings together
can
comprise one "bad" averaged bearing: An example of this would be
if you got four "good" bearings - one each from the North, South, East
and West. Clearly, the average of these bearings is no direction
at all and this result is "bad."
When changing a mode that requires press-and-holding the button
(e.g.
turning
averaging on/off or switching between running and sliding average) the
feature changed by a momentary button press may occasionally be
triggered
as well (e.g. turning on/off the average may also switch between dim
and
bright.) This has been traced to the "bounce" caused by some
switches
where they may make intermittent contact as they are released. In
testing, additional software "debouncing" was tried to prevent this,
but
this ruined the "feel" of the switch action. In other
words:
Just get used to it (or try a different switch.) Remember not
to put a capacitor across this switch or else it won't work at all!
It is possible to drive more than one Compass Rose display board
from a
single DF unit, where the extra compass rose display was mounted in a
location
more easily seen than the one on the DF unit. See the Outboard
Compass Rose Display page for more info.
Note: The only information sent to the
compass
rose
display pertaining to quality is that it is "Good" (equal to or above
the
"quality factor" threshold) or "Bad" (below this threshold.)
While
the absolute quality could have been sent to the display, Jacques'
original
data format was preserved for compatibility.
Comments pertaining to the use of the 36 LED compass
rose display and the display of the "averaged" bearing when used with
the Doppler II or Doppler III "alternate" firmware:
For firmware versions olderthan "2E":
This "alternate Compass Rose" firmware has the capability of displaying
a "live" bearing (in green) and an "averaged" bearing (in yellow) while
"bad" bearings are displayed in red.
In order for this firmware to have been compatible with the original
Doppler III firmware, the "average" bearing is calculated by the
compass rose display itself, based on the bearings that it has
received. Because the original data format contains only
the bearing (represented as a number 0-35) and whether or not it was a
"bad" bearing, the compass rose display cannot do any averaging based
on the varying quality of those bearings.
The alternate firmware for the Doppler II/III currently provides for
being able to send either
the "current" (integrated - but not averaged) bearing to the compass
rose (to be displayed in green) OR the "averaged"
bearing to the compass rose (to be displayed in green as well.)
This has two implications:
If you send the "current" bearing to the compass rose (the "INT"
setting on the "ROSE" parameter) the averaged displayed on the compass
rose in yellow is not the averaged bearing that you see
on the LCD, but rather an averaged bearing calculated by the
compass rose display itself based on the bearings that it
receives.
If you send the "averaged" bearing to the compass rose (the "AVG"
setting on the "ROSE" parameter) the bearing displayed in green is
the averaged bearing as shown on the LCD (and the "current"
integrated-only bearing is not displayed on the LED compass
rose at all) and that the "averaged" display on the LED compass rose
(in yellow) is really an "average of the average."
Personally, I normally set the "ROSE" parameter to "INT" when doing
transmitter hunting. While this doesn't provide for as
well-filtered a reading as setting it to "AVG" would, when in a moving
vehicle, bearing trends are the most important factors, anyway.
While in this mode, the green LED may go all over the place with
multipath, the yellow LED does a good job in showing trends.
Why would you want to set the "ROSE" parameter to "AVG" then? The
main disadvantage would be that showing a bearing based only on an
average may slow its response somewhat, but this can be mitigated by
using the "AC" (average clear) function to allow very fast response to
a brief carrier - even when a "slow" averaging is selected.
Additionally, there may be cases where the signal is very weak or the
bearings of poor quality where displaying the average (and the "average
of the average") may be helpful in identifying bearing trends that
would otherwise be difficult to spot.
For firmware versions "2E" and newer:
Beginning with firmware version "2E"(in conjunction with
the Alternate Firmware "7A" or newer) it is possible to
send both the "current" (integrated) and
the "averaged" bearings, as displayed on the LCD, separately.
In
previous
versions,
the
"average"
displayed on the compass rose was
based soley on the past 16 bearings that had been received by the
compass rose and had nothing to do with the average calculated
and displayed on the LCD.
With this newer firmware, if the "ROSE" parameter is set to "BTH"
(meaning "both" bearings) then the compass rose display will
automatically display the "current" bearing (on the left side of the
LCD) in green and the "averaged" bearing (on the right side of
the LCD) in yellow.
Compatibility information:
Compatibility with the original Doppler III firmware: The
"Alternate" compass rose firmware described on this page may be used
with at least some versions of Jacques' original Doppler III
firmware. (I say "at least some" because I have tried it only
with the version that I have and do not know if earlier/later versions
had some differences that might cause incompatbility.) I
have observed that the original VE2EMM-supplied compass
rose firmware may not be compatible with the "Alternate
firmware" for the
main Doppler unit: I have no idea why this would be... Usability if you do not install dual-color LEDS:
I
have
not
tried
it,
but the newest version of firmware (described
below) should be at least somewhat usable even if single-color
LEDs are installed. If this is done, there are a few things to
consider:
The "Invert Color" setting (see below) may have to be
activated. If the polarity is incorrect, one would see only "bad"
readings with the single-color LEDs.
Disabling "average" display. With only one color, it may be
difficult to tell the difference between the "average" and the
"current" bearing - although the "average" will be slightly dimmer
owing to the fact that it's yellow color is a mix of two colors.
Disabling the "average" will also cause the center LED to blink red or
green if a bad or good bearing is being received, respectively.
Only the "north" cardinal point LED will appear to blink.
Firmware version information:
The version number of the compass rose firmware is written
directly on the chip itself.
Version "1R" (dated 20050323). This was the first
version to be released.
Version "1S" (dated 20050719). Minor changes
were made as noted:
Selection options swapped: A momentary press
of the button to V+ will toggle
between
dim and bright while press-and-hold of the button to V+
will toggle
enable/disable
of the history display.
The brightness of the blinking cardinal points has been increased
to
make
them more visible in the dark.
A slight adjustment was made to make the "Average" LED appear
more
"Yellow"
in color.
Version "2E":
Originally, the "averaged" bearing displayed was calculated based
on the past 16 bearings received: This average had nothing to do
with the averaging done by the main Doppler unit. This
modification optionally allows the compass rose to receive the averaged
bearing in addition to the "current" (integrated-only)
bearing so that the bearing displayed on the LED compass rose matches
what is shown on the LCD and is affected by the averaging settings of
the main Doppler unit. Note that this new function requires
newer code in the main Doppler unit, but is backwards-compatible with
earlier versions of the alternate firmware and is has been tested with
a version of Jacques' original Doppler III code.The last "good"
bearing is now frozen.
Previously, the
"good" bearings were shown in green and the "bad" bearings were shown
in red - but the green "good" bearing disappeared as it was displaced
by "bad" bearings. Now, the last "good" (green) bearing remains
if the unit starts displaying "bad" bearings - but the "bad" (red)
bearings disappear when "good" (green) ones appear once again. (Did
that
make
any
sense?)
Modified blinking of cardinal points to have the same brightness
but reduce duration of the blink itself.
Minor tweaking to reduce the occasional corrupted data bit.
Once in a great while (one out of several thousand bearings) the
compass rose would mis-read a bit sent over the serial stream. It
is
extremely
unlikely
that
the
average user would have ever noticed
this.
Additional configurations/features. These
functions are "toggled" by grounding the specified pin through a
resistor (a value from 220 to 1000 ohms) while the unit is powered
up. These settings are retained in nonvolatile memory and are
thus "remembered.":
RB0 (pin 6) - Color Mix
adjustment - This toggles the color
"mix" setting to make
"yellow"
between 25%-75% and 50%-50%. Using the specified Liteon LED (see
above) the best "non-red, non-green" color (called "yellow" - but
it is really more of an amber hue) is obtained by
using 75% green and 25% red. There are other LEDs that may be
used, however, that produce a good "yellow" using a 50%-50% mix of red
and green. Default = 75%green, 25% red.
RB1 (pin 7) - Color inversion - This
toggles between "inverting" of
color. If,
for some reason, you managed to put all 36 LEDs of the compass rose in
backwards, this will save your having to resolder each of them as it
exchanges red for green and vice-versa (including for the "yellow"
mix.) Note that this does not affect the center
LED.Default = Inversion is off (e.g. LEDs are
assumed to be installed "backwards" from the original artwork.)
RB2 (pin 8) - "Same LED Blink" - This toggles
enable/disable of "Same LED"
blink.
If enabled, this feature causes the color of the LED to alternate if
more than one color is to be displayed on the same
LED. For example, an LED will alternate between Green and Yellow
if the "current" and "averaged" bearing are on the same LED, it will
alternate between Green and Red if the "current" and "bad" are on the
same LED, and it will alternate between Yellow and Red if the "average"
and "bad" are on the same LED. Default = "Same LED Blink"
is on.
RB3 (pin 9) - Rotate display 180 degrees - This
toggles "180 degree rotation" of the
display. If you have, for some reason, mounted the compass rose
upside-down, this causes the displayed bearings to be rotated 180
degrees to accommodate this. The "spinning" LEDs at power-up also
indicate that this mode is active as they always start their spin from
the "North" LED. If you have an outboard compass rose that is
likely to be mounted in different places, this feature (along with the
addition of a switch to select it) might be useful. Default
= Display is not rotated.
RB4 (pin 10) - Turn off "BAD" readings - This
toggles suppression of "BAD"
readings.
When active, "Bad" readings (in red) are completely suppressed and
never displayed. Default = "Bad" readings are displayed.
RB5 (pin 11) - Fast/Slow Cardinal Point blinking
- This toggles fast/slow cardinal point and
center LED
blinking. Fast blink (default) is about twice-per-second while
"slow" blink is about one blink every 1.5 seconds or so. Default
=
"Fast"
cardinal
points/center
LEDs
are blinking.
RB6 (pin 12) - Enable/Disable Cardinal Point blinking
- This toggles enable/disable of cardinal point
and
center LED blinking. This is used if, for some reason, the
blinking of the cardinal points annoys you. Default = Cardinal
point/center LEDs are blinking.
RB7 (pin 13) - "Average" display disable -
Disables reception of "Average" from the
main
Doppler unit if it has code that supports it (e.g. Version "7A" or
newer of the "Alternate" firmware.) This feature may also be
used to take care of some (presently unknown) incompabitility with
older code or, perhaps, Jacque's code. If you simply want to
prevent it
from being
displayed, or if you have multiple compass rose display units and want
to prevent one or more of them from using the main unit's averaging
while allowing it for other. (If set to "disable" the compass
rose display will base display the "current" (integrated) reading in
green and show its internally-calculated average - if enabled - in
yellow when the main Doppler unit is set to "BTH" [e.g. "Both"] under
the "Rose" parameter.) Default = Average display is enabled.
Version "2F":
Changes since version 2E:
On previous versions, the blinking of the center LED would change
color to indicate whether or not the unit was in "Sliding Average" or
"Running Average" mode, or if the average display was disabled, the
center LED would blink green for good bearings and red for bad
bearings. With version 2F the LED only
shows red and green to indicate bad or good bearings,
respectively: It is up to the user to determine, by observation,
whether the averaging mode is "sliding average" or "running average."
On previous versions, when the "Cardinal Point Blinking" was
disabled using RB6 (pin 12)see above the center
LED was never illuminated. With version 2F,
if
cardinal
point
blinking
is
disabled the center LED will stay on continuously
and indicate red for a bad bearing and green for a good bearing. Note:
If
you
prefer
to
operate
in this mode you may wish to adjust the value
of the series resistor to adjust the brightness of the center LED to
make it better-match the other LEDs.
If you have an older version and wish to update it, please let me
know.
On July 20, 2005, a number of corrections were made to the
documentation,
pertaining to the center LED and blinking cardinal point LEDs:
Sorry
for any confusion.
AVAILABILITY:
For information about availability of this
firmware, please go
here.
If you plan to use this compass rose with the older Doppler II unit,
you may have to make your own circuit board. It
has
been reported that Jacques is willing to sell just the compass
rose
display board, but that the availability of these may be limited due to
their being made as a pair with the companion main Doppler III board.
Disclaimer:
While the code used in the Doppler unit itself was originally
based on that of the original Montreal
Doppler
II DF unit by Jacques Brodeur, VE2EMM, the code for this compass-rose
display was not.. Because this work was my
own
and was not done with his involvement, Jacques cannot reasonably be
asked
to offer any support or assistance regarding its operation!
Although good faith efforts have been made to make certain that
the
operation of the hardware/firmware is as described, it is possible that
"undocumented features" (bugs) may be present: It is through
testing,
use, and feedback from the users that projects such as this may be
improved,
and the user is asked to be understanding of this fact. This
firmware
is strictly intended only for non-commercial amateur-radio use and any
other use is in violation of applicable laws.
Do you have any questions on this or other DF-related
topics? Go here.